I’ve had a chance to shoot with the DxO One iPhone camera for a month, and it’s darned impressive—a bit funky (technologically speaking), but darned impressive. As a picture-taking tool, the DxO One is much better than the camera in any iPhone, and you end up with a display that’s bigger and higher resolution than the displays in most DSLR cameras.
If you’re a casual i-photographer, the modest hassle of using the DxO One and its almost immodest cost may be too much for you. But if you’re serious about your shooting and don’t want to lug a bigger camera with you everywhere, read on to learn more.

Small and connected
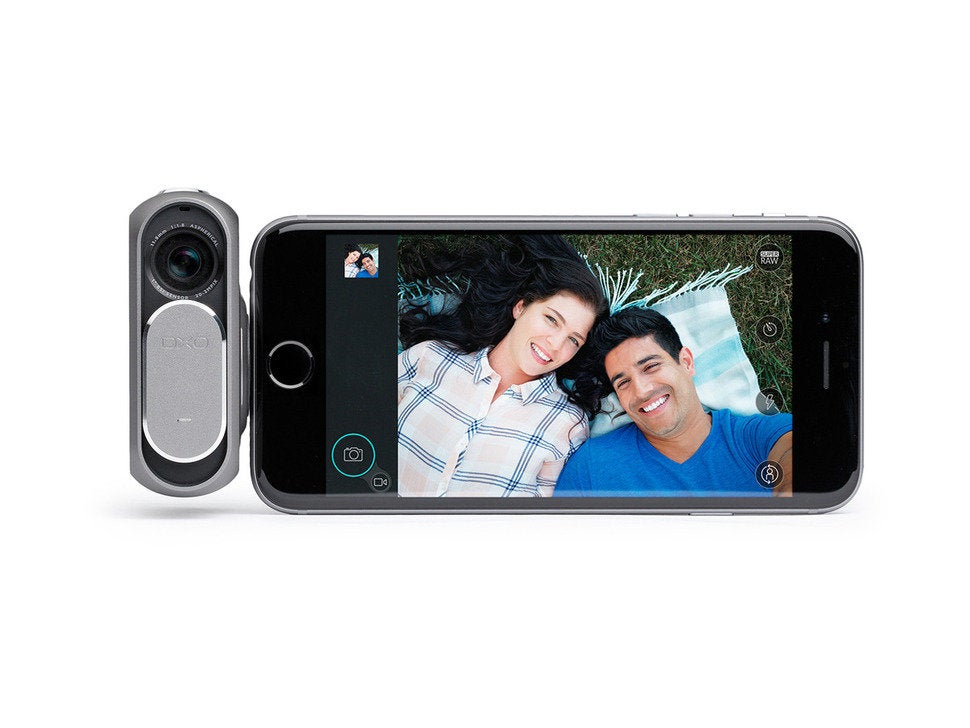
Like the Sony and Olympus “lens-style” cameras that have been around for a year or two, the DxO One is smaller than competitive cameras because it doesn’t have a display of its own. The DxO One connects to your iPhone and you control it from an app. I’ve shot with the Olympus Air lens-style camera and I like it, mainly because I already have a collection of excellent micro four-thirds lenses. But the Olympus Air is the size of a baseball, and that’s before you add a lens, so it’s a pocket camera only if you’ve got big pockets and don’t mind looking lumpy. The DxO One, on the other hand, is a little smaller than my wallet and fits innocuously in a pocket.

Equally important, the DxO One is easy to start and reliable enough that you’ll want to use it all the time. The key to this achievement is DxO’s decision to connect to the iPhone not by Bluetooth or Wi-Fi but via the Lightning port. No need to pair devices or select a private Wi-Fi network—just slide the lens cover to pop out the connector and plug the DxO One into your iPhone. The DxO One app launches automatically (most of the time) and voilà: you’re ready to shoot. While shooting, the lightning connection is faster and more reliable than a wireless connection.


The DxO One’s Lightning connection was questioned as a weak link by at least one respected early reviewer. I understand the concern, but after a month of daily use (including frequent shooting while the iPhone was mounted on a tripod and DxO One hung off the side), I found that the Lightning connection, while not goof-proof, is reasonably secure. I never dropped the DxO One. I did drop my iPhone 6 Plus while shooting, once, at the start of the testing period. I’d taken the case off my iPhone and was not used to how slippery the naked iPhone really is.

The app for that
The camera has a physical shutter button and there’s a postage-stamp sized touch-sensitive display on the back that is useful mainly to let you know whether the DxO One is on, off, or asleep. Otherwise, every aspect of the camera’s operation—even shutter activation, if you like—is controlled through the DxO One iPhone app.
The visually-appealing and intelligently-designed app is a worthy companion to the camera. It provides the classic shooting modes (program, aperture priority, shutter priority, manual, and full auto) plus a handful of scene modes (sport, portrait, landscape, and nighttime). It also provides most of the controls found on stand-alone cameras: aperture, shutter speed, ISO, exposure compensation, focus method, exposure method, white balance, flash, capture-file format, timer, etc. And thanks to the connectivity provided by your iPhone, the DxO One’s images are automatically geotagged and, if you like, can immediately be shared with friends.
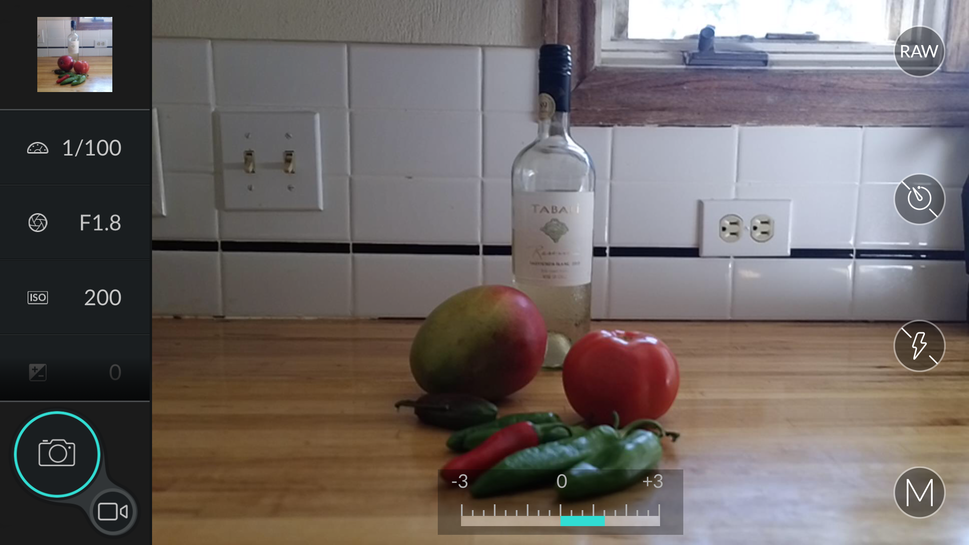

I do have a few complaints about the app. You can tap on the screen to indicate where you want to target exposure and focus; but after 15 seconds, the app will move the target back to the center. I really wish I could tap to do everything: autofocus, adjust exposure, and snap the picture. Finally, at the time of this writing, the app doesn’t do burst shooting, take sweep panoramas, or have a time-lapse option.
Balancing act
Holding both phone and camera takes a little getting used to. The DxO One balances somewhat better with a normal-sized iPhone 5 or 6 than it does with my oversized iPhone 6 Plus. I didn't try connecting DxO One to an iPad, but I suspect this might be awkward.


It took a day or two for me to learn how to keep my right index finger from obstructing the DxO One’s lens. You can hold the iPhone and DxO One in the same plane flat in front of your face, but the fact that the DxO One’s Lightning connector tilts 60 degrees in either direction provides options. You can even plug the DxO One in backward, point it at yourself and take a pro-level selfie.
Battery life is okay for occasional use but lousy if you want to shoot a lot. Since the DxO doesn’t have a removable/replaceable battery, when I knew I’d be shooting all day, I stuck a small supplemental charging unit in another pocket.
DxO One advantages
DxO built a better camera for the iPhone by keeping what’s already great (the iPhone’s display) and providing an alternative to what’s not so great about the iPhone camera (the lens and the sensor). This is where DxO draws upon its internationally-recognized expertise in lens and sensor testing.

The DxO One’s 11.9 mm lens (32 mm in full-frame terms) was manufactured to DxO’s specs. Slightly less wide than the iPhone’s, its angle of view seems to me just about perfect for everyday photography.

But unlike the iPhone’s lens with its fixed f/2.2 aperture, the DxO One’s lens has a variable aperture with range from f/1.8 to f/11. This means you have all three of the options for controlling exposure that you have on a pro-level DSLR. The DxO One also gives you dramatically better control over depth of field—the larger sensor means that you can shoot at f/1.8 or f/2 and blur backgrounds nicely in your portraits. With the iPhone’s tiny sensor, you get a lot of depth of field all the time, whether you want it or not.


The DxO One’s 1-inch backside-illuminated (BSI) CMOS sensor provides another advantage. It’s 6.5 times larger than the sensor in the iPhone 6, and, other things being equal, bigger sensors capture images with less noise.
And, unlike the iPhone, the DxO One offers the ability to save raw sensor data, in not one but two raw formats: ordinary raw (.DNG) and ”SuperRAW” (.DXO). SuperRAW files store data from four consecutive exposures made in a fraction of a second. Noise is a more or less random phenomenon; using sophisticated spatial and temporal analysis of the four nearly-identical exposures, DxO’s software identifies pixels that represent noise in each exposure and replaces them with non-noise data from the corresponding pixel location in the other exposures.

DxO’s default processing of SuperRAW files generates results that vary greatly in quality. If you’re holding the camera in your hands and/or the subject is moving, analyzing the four exposures is a bigger challenge and the resulting image may display the smearing sometimes produced by aggressive noise reduction. But if the camera was on a tripod and the subject was stationary—say, shooting a building at night—the results are amazing. The main downside is that SuperRAW files are huge—upwards of 100MB. You will want to shoot ordinary raw most of the time, but it’s nice to have SuperRAW when you really need it.
As of this writing, the only software that can handle the DxO One’s SuperRAW (.DXO) format files is DxO’s own Optics Pro 10.5 ($129 essential edition; $199 elite edition). Optics Pro 10.5 is one of the best raw converters available, and, for a limited time, a license for DxO Optics Pro comes with every DxO One. I tested a beta build of an extension that provides support for SuperRAW files in Photos in El Capitan and it worked beautifully; check the DxO website for the Photos extension availability. In the meantime, if you stick to normal raw (.DNG), you’ll be in great shape no matter what software you use to process your photos.

The DxO One comes bundled with a special desktop app called DxO Connect. At first glance, DxO Connect looks like a straightforward photo importer, like OS X’s Image Capture app. But Connect also has the ability to do powerful basic raw-to-JPEG conversions that benefit from DxO’s sophisticated lens and exposure corrections. Serious digital darkroom types will want the full DxO Optics Pro application; but DxO Connect does a terrific job and it’s drop-dead easy to use.

Note that the DxO One does allow you to turn raw capture off and save JPEGs only. I recommend that you shoot raw, which lets you get the most from your images.
In recent years, I think reviewers, consumers, and camera-makers alike have over-emphasized the importance of high-ISO performance when judging cameras. I am as thrilled as the next person that the DxO One can shoot at ISO 51,200 but if you find yourself shooting at ISO 51,200 often, you’re doing something wrong.
You want better photos, learn how to get more and better light. One way to do that is to add flash, and here the DxO One really outshines (pun intended) not just the iPhone but many other larger-sensor standalone cameras with pop-up flash. Because the One’s lens is at one end of the contraption and the flash is six or seven inches away at the other end, the flash is well off the lens axis, like a hot-shoe flash used with a DSLR. That means that the DxO One actually produces flash results without the floodlight look you get using flash with the iPhone’s camera.


No comments:
Post a Comment